Wrong Microphone Selected? Fix the Wrong Input Device Fast
If your computer keeps using the wrong microphone the problem is usually not the hardware itself. In most cases Windows, macOS, Chrome or web meeting apps like Zoom and Microsoft Teams are still using an old input device. This happens frequently when a laptop securely holds onto the built-in microphone instead of switching to your newly connected headset.
The fastest fix is to check the system input first before digging into app settings. You need to verify the default communication device and ensure the browser has permission to listen. Testing the input volume and checking Bluetooth connections will usually reveal why the wrong input device is active.
🔄 Why your computer keeps using the wrong microphone
Operating systems try to be smart about audio routing but they often fail when multiple devices are connected. If you plug in a USB microphone while a webcam microphone is already active the system may not switch automatically. This leaves you talking into a high-quality mic while the computer records muffled audio from across the room.
Another common reason is software overrides. Even if you change the default recording device in Windows 11 an application like Discord might have a hardcoded choice saved in its settings. To fix this permanently you must align the OS default microphone with the specific app setting so they no longer conflict.
✅ Quick fix checklist before you change any settings
Before diving into system menus verify the physical connections. Ensure the 3.5mm input jack is fully inserted or try a different USB port for your external mic. Sometimes a loose connection causes the OS to drop the new device and fall back to the internal microphone selected instead of USB mic.
Next check the physical hardware controls. Make sure the mute switch on your headset cord is not engaged. A muted microphone will act exactly like a missing one prompting the system to select an alternative. Finally close any background apps that might be holding exclusive control over your preferred audio interface.
💻 How to select the correct microphone on Windows 11 and Windows 10
Set the default input device
Press the Windows key and type Sound settings to open the audio menu. Scroll down to the Input section where it says "Choose a device for speaking or recording". Click the dropdown menu and select your preferred device from the list. Microsoft notes that support for Windows 10 ends on October 14, 2025 but the audio control panel remains very similar across both versions.
Set the default communication device
Windows separates general audio from communication audio. Open the traditional Control Panel and go to Sound then click the Recording tab. Right-click your desired microphone and select "Set as default sound device". Right-click it again and choose "Default communication device" to ensure apps like Skype use it automatically for voice calls.
Check app permissions and desktop app access
Even with the correct device selected Windows might literally block it. Open Settings then navigate to Privacy & Security and select Microphone. Make sure "Let apps access your microphone" is toggled on. Scroll down further and verify that "Let desktop apps access your microphone" is also enabled otherwise traditional programs cannot hear you.
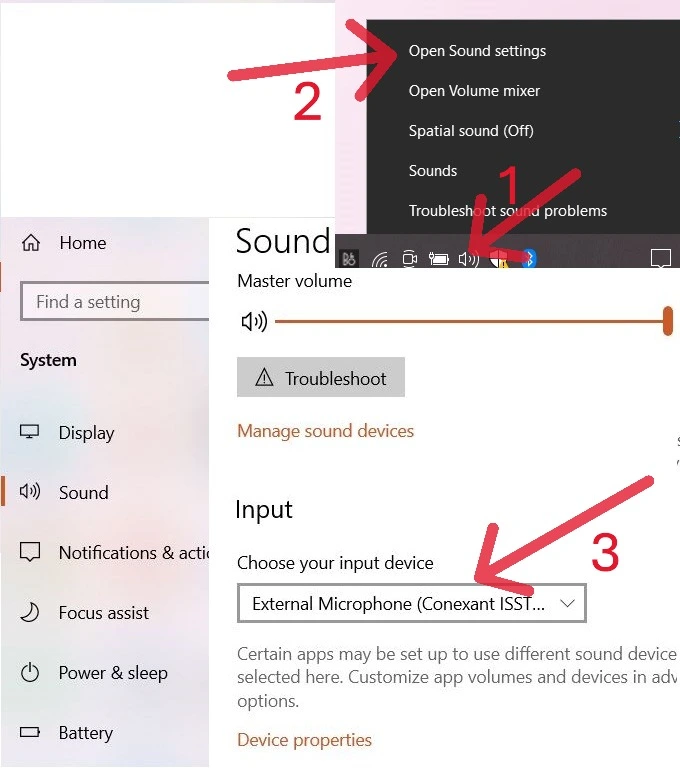
Figure 1. Microphone Input device Selection in Windows
Test your microphone and adjust input volume
In the Sound settings menu look for the Microphone test section. Speak at a normal volume and watch the input volume bar bounce. If the bar barely moves click on the device properties and increase the input volume slider to 100%. If the microphone is selected but the bar remains totally flat you likely have a hardware or connection problem.
Reinstall or update audio drivers in Device Manager
If the right microphone does not even appear in the list a driver issue is likely the culprit. Press Windows + X and open Device Manager. Expand Audio inputs and outputs, right-click your microphone manufacturer name and select Update driver. If that fails right-click to uninstall the device then click Action and select "Scan for hardware changes" to reinstall a fresh audio driver. You can read more about fixing outdated drivers to permanently resolve disappearing hardware.
🍎 How to select the correct microphone on Mac
Change the Input source in Sound settings
On macOS click the Apple menu and open System Settings then click Sound in the sidebar. Select the Input tab to view all connected recording devices. Click on your preferred external microphone to set it as the primary Input source. The system will immediately switch over from the MacBook microphone to the new device.
Fix low Input volume
While still in the Input tab speak out loud and watch the input level meter. If the meter does not register your voice drag the Input volume slider to the right. Apple devices sometimes reset this volume to zero when a new USB microphone or audio interface is connected for the first time.
Check Privacy & Security microphone permissions
If the input level meter moves but your web browser remains silent check your system privacy settings. Go to System Settings then Privacy & Security and click Microphone. Ensure the toggle next to your specific application is turned on so the app has permission to access Core Audio. If the microphone permission is blocked the app cannot use the selected input.
Disconnect AirPods or external devices that override the built-in mic
macOS prioritizes paired Bluetooth devices aggressively. If you have AirPods or a wireless headset connected the system often routes audio through them automatically. If you intend to use the built-in microphone instead open Bluetooth settings and temporarily disconnect the headset to force macOS to revert to the internal audio input.
Test your mic in QuickTime Player
Apple includes a built-in way to test input natively without relying on a browser. Open QuickTime Player, click File then New Audio Recording. Click the small arrow next to the record button and ensure your correct microphone is checked. Speak into the mic to verify the audio levels are capturing correctly.
📼 App fixes: Zoom, Teams, Google Meet, Discord
Change the mic inside Teams Device settings
Microsoft Teams frequently ignores the Windows default settings. Click the three dots near your profile picture and open Settings then select Devices. Under Audio devices find the Microphone dropdown and select your correct headset. You should also toggle on "Automatically adjust mic sensitivity" to optimize your voice levels during calls.
Change the mic in Zoom Audio settings
Zoom offers highly granular audio controls that overwrite OS defaults. Open the Zoom desktop app, click your profile icon and go to Settings then Audio. In the Microphone section choose your device from the dropdown menu and click "Test microphone". If you are playing music you might also want to enable "Original sound for musicians" to prevent Zoom from filtering out your audio.
Fix Google Meet microphone access and browser permissions
Google Meet runs entirely in the browser making it susceptible to site setting conflicts. Click the three vertical dots in the Meet interface and open Settings then Audio. Verify the Microphone dropdown shows the correct device. If it still does not work click "View site information" in the URL bar to ensure the browser is not blocking the microphone permission explicitly.
Choose the correct Input Device in Discord Voice & Video
Discord is notorious for clinging to old input devices. Open User Settings by clicking the gear icon next to your name and select Voice & Video. Under Voice Settings change the Input Device dropdown from Default to your specific connected mic. If your friends still cannot hear you check if "Push to Talk" is accidentally enabled instead of Voice Activity.
🌐 Browser fixes when the wrong microphone is selected in Chrome or Edge
When using web recorders or browser calls Chrome and Microsoft Edge sometimes grab the wrong hardware. Go to chrome://settings/content/microphone in your address bar. Use the dropdown menu at the top of the page to force the browser to use your preferred external mic. Refresh the page containing your meeting app to apply the new hardware routing.
If Safari in macOS selects the wrong device you cannot change it within the browser settings. Safari strictly mirrors the macOS Sound settings Input tab. You must change the default input device at the system level and then reload the Safari tab for the change to take effect. If you face further browser anomalies refer to our guide on common microphone problems.
🚀 Advanced fixes for Bluetooth headsets, USB mics, and webcam microphones
When dealing with multiple USB microphones or webcam microphones the OS might get confused by identical driver names. Unplug every USB audio device except the one you want to use then restart the computer and set it as default. Once locked in you can reconnect the other devices safely. Knowing why microphone testing matters ensures you catch these routing errors before you join an important conference.
Bluetooth headsets often present two different profiles to Windows: a high-quality Stereo output and a lower-quality Hands-Free AG Audio profile. You must select the Hands-Free profile as the input device for the microphone to function properly. If you want to refine your audio further after selecting the right device check out our guide on how to improve microphone quality for professional setups.
Want to confirm your microphone is working? Use our Mic Test Tool to instantly check sound input.
Test Your Microphone