How to Improve Microphone Quality
A microphone rarely sounds bad because of the microphone itself. Most quality problems come from room acoustics, mic placement, gain staging or the lack of software processing. A budget USB microphone in a treated room with proper technique will outperform an expensive condenser mic used with poor setup. This guide covers the entire signal chain so you can improve your microphone quality step by step.
🏠 Optimize Your Recording Space
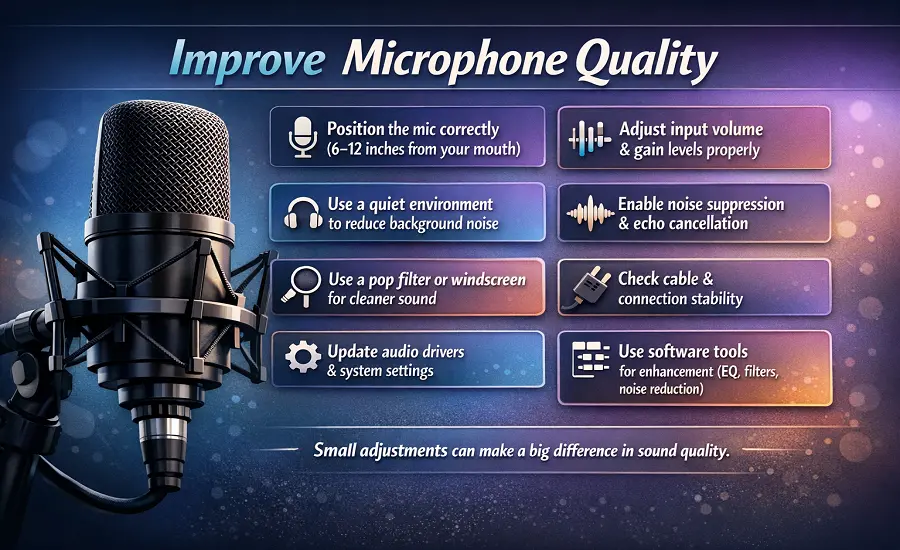
Even a top-quality microphone can sound disappointing without the right setup. You don't need expensive gear to improve your mic performance but just a few smart adjustments can instantly boost your sound quality and make your recordings stand out. The first step to make the sound better is your environment. Background noise and echo can ruin even the best recordings. Record in a quiet room, add soft materials like rugs, curtains or foam panels to absorb reflections. If you can position yourself away from hard surfaces that bounce sound back into the mic.
Position Your Microphone Correctly
Microphone placement makes a huge difference. Keep your microphone about 6 - 12 inches from your mouth and angle it slightly to the side to avoid harsh 'P' and 'B' sounds. Small changes in position can dramatically improve clarity and reduce unwanted noise. Investing in the right accessories can significantly enhance your overall setup, especially when paired with a microphone that suits your specific needs and recording environment. A pop filter softens sharp consonants while a shock mount prevents vibrations from reaching your mic. Using an audio interface or pre-amp can also help control gain and reduce hiss thus giving your recordings a clean and balanced tone.
Maintain and Test Regularly
A well-maintained microphone not only lasts longer but consistently delivers clearer and more reliable sound. Keeping your mic clean, dry and properly covered when not in use helps prevent dust buildup and moisture damage that can slowly affect audio performance. Many of these minor performance drops are actually common microphone problems that have simple fixes once identified. With just a few routine checks and tweaks you can achieve clearer and richer sound than ever. Also ensure your microphone is not muted at the system level before running any quality checks.
🎚️ Gain Staging and Input Level Setup
Gain staging is the process of setting the right input level so your voice is loud enough without distortion. If the gain is too low your voice will be quiet and buried under the noise floor. If the gain is too high the signal clips and creates harsh distortion that cannot be fixed later. Aim for peaks between -12 dB and -6 dB on your input meter to leave enough headroom for louder moments.
On Windows open Sound Settings and adjust the input volume slider for your microphone. Turn off automatic gain control (AGC) in your app settings because it constantly adjusts levels and creates inconsistent volume. On macOS the same adjustment is available in System Preferences under Sound Input. If your microphone has a physical gain knob use it to find the sweet spot before adjusting software levels. Getting gain right at the source is the foundation for cleaner audio.
📍 Use the Microphone Pickup Pattern Correctly
Every microphone has a pickup pattern that determines which direction it captures sound from. A cardioid microphone picks up sound mainly from the front and rejects noise from the sides and rear. This makes cardioid the best choice for solo voice recording in most environments. Speaking into the wrong side of the mic or at the wrong angle dramatically reduces voice clarity and increases background noise pickup.
Side-address microphones like the Blue Yeti or Rode NT1 capture sound from the side of the capsule not from the top. End-address microphones like the Shure SM58 capture sound from the tip. Check your microphone documentation to confirm which side is the front. Omnidirectional patterns pick up sound equally from every direction which works well for group settings but poorly for noisy rooms where you need focused voice capture.
🔧 Pop Filters, Shock Mounts and Vibration Control
Plosive sounds from words starting with P and B create bursts of air that hit the microphone diaphragm and produce a loud low-frequency thump in your recording. A pop filter placed 2 to 3 inches in front of the microphone blocks these air bursts without affecting your voice tone. Foam windscreens work similarly but offer less protection than mesh pop filters for indoor recording.
Desk vibrations from typing, mouse clicks and accidental bumps travel through your desk into the microphone stand and into your audio. A shock mount suspends the microphone in elastic bands that absorb these vibrations before they reach the capsule. Mounting your microphone on a boom arm instead of a desk stand further isolates it from surface vibrations and gives you more control over positioning and distance.
💻 Software Processing That Actually Improves Sound
Hardware improvements set the baseline but software processing polishes the final result. Start with AI noise suppression tools like NVIDIA Broadcast, Krisp or the built-in noise reduction in OBS Studio and Discord. These tools filter out keyboard clicks, fan noise and background hum in real time without noticeably changing your voice quality. For recording workflows Audacity offers free noise reduction and EQ tools that work well for basic cleanup.
Apply processing in the correct order for the best results. Start with a high-pass filter to remove low-frequency rumble below 80 Hz. Then apply a light EQ to reduce muddiness in the low-mids and add a subtle presence boost around 3 to 5 kHz for voice clarity. Follow with a compressor to even out volume differences and a de-esser to soften harsh S and T sounds. This plugin chain matches what professional podcasters and streamers use in tools like Elgato Wave Link, VoiceMeeter and GoXLR.
⚙️ App-Specific and OS-Specific Quality Fixes
Your operating system and communication apps each have audio settings that affect microphone quality. On Windows 11 check the recording format under advanced device properties and set it to at least 16-bit 48000 Hz for better audio resolution. Disable exclusive mode if other apps need access to the microphone at the same time. Make sure your audio drivers are up to date because outdated drivers can introduce latency and quality degradation.
Inside Zoom, Microsoft Teams and Google Meet look for noise suppression and audio enhancement toggles in the audio settings. Discord has its own noise suppression powered by Krisp along with echo cancellation and automatic gain control options. OBS Studio offers per-source audio filters including noise gate, compressor and VST3 plugin support. Adjusting these settings per app prevents one platform from degrading the quality you set up at the system level.
🔌 When Hardware Upgrades Are Worth It
A built-in laptop microphone captures everything in the room equally with minimal detail. Upgrading to an external USB microphone like the Audio-Technica AT2020 USB or Blue Yeti immediately improves voice clarity and background rejection. USB microphones are plug-and-play on Windows and macOS which makes them the easiest upgrade for remote workers and content creators who want better sound without a complex setup.
For professional recording and streaming an XLR microphone with a dedicated audio interface provides the cleanest signal path. Models like the Rode NT1 paired with a Focusrite Scarlett interface offer studio-level quality at an accessible price. The audio interface gives you physical gain control, low-latency monitoring through headphones and cleaner preamp circuitry than any USB connection. If you are unsure which direction to go read our guide to choosing the right microphone for your specific use case.
🎯 Test, Monitor and Iterate
Every improvement you make should be verified with a real test. Record a short sample of your voice after each change and play it back through headphones to hear the actual difference. Compare your baseline recording with the improved version to confirm that the change actually helped. Understanding why microphone testing matters turns this from a one-time setup into a reliable workflow.
Use headphones instead of speakers when monitoring your voice during recording or calls. Speakers create a feedback loop that your microphone picks up which masks the real quality of your input. Before any important meeting or recording session run a quick permission check and mic test to confirm everything is working. Building this habit into your workflow prevents last-minute audio surprises and ensures consistently professional sound every time.
Want to hear the difference after these adjustments? Use our Mic Test Tool to test your microphone and check sound quality in real time.
Test Your Microphone